
You’ve got a new pair of insoles… but they won’t fit in your shoes.
It happens all the time. Whether they’re work boots, tight-fitting dress shoes, or sneakers with a cushiony liner, chances are a pair of insoles may not fit perfectly in your shoes right out of the box.
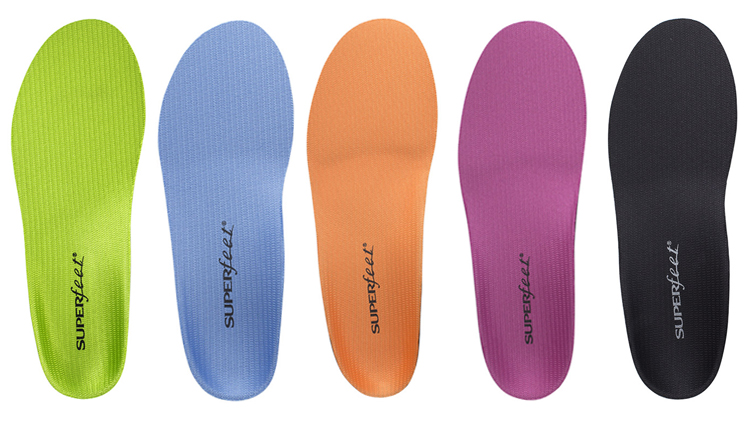
In fact, “Are these insoles trimmable?” is one of the most common questions we get at insoles.com. For most of our insoles the answer is: Yes, they are. These days most of the over-the-counter insoles are trimmable, which is a great feature.
Choose your insole size according to your foot size. It will likely be a perfect fit in your shoe. If not, follow these 4 simple steps to trim the end of the insole. This insole trimming guide is only for full-length insoles; ¾ length insoles should fit in the shoe without trimming.
Are you supposed to trim your insoles?
We get it: you just bought a pair of insoles, are you supposed to actually cut them?
For the most part, yes. Trimming insoles can be a necessary step to ensure they fit in your shoes. This is because insoles are often sold in standard sizes, which may not precisely match the interior dimensions of your specific footwear.
Trimming insoles ensures:
- Proper fit for your shoes
- Prevents discomfort and blisters
- Mitigates imbalance caused by an insole moving or crumpling in your shoe
If you find that your insoles are too big or not fitting snugly, don’t hesitate to trim them for your comfort and overall foot health. Now, follow our easy 4 steps to trim your next pair of insoles!
How to trim your insoles: 4 simple steps
Trimming an insole might sound intimidating if you’ve never done it before, but don’t worry. Follow these four simple steps and you will be set.
Remember, measure twice and cut once!
Step 1: Remove the liner from your shoe
Remove the existing liner from the shoe. Removing the liner will ensure there is plenty of room for your foot. (If the manufacturer’s shoe liner is not removable then you will need to leave it in the shoe and wear it with the insole.)
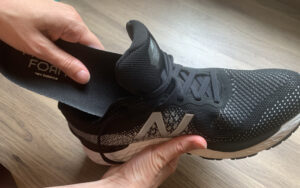
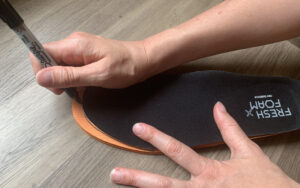
Step 2: Use the liner as a pattern to outline your insole
Use the liner you have removed from the shoe as a pattern. Line up the edge of the heel of the liner with the edge of the heel on the insole and also the inside edges of both. Use a pen or marker to trace the outline of the liner onto the insole. If your shoe does not have a removable liner to use for tracing, you will have to do your best to use the shoe itself as a pattern. There may be a little guesswork involved for the length.
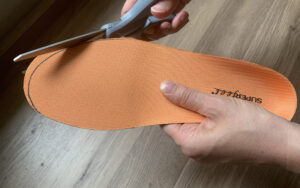
Step 3: Trim your insole along the marked line
Trim the insole along the line you have marked. It is best to trim just outside the line to ensure it will not be too short. It is better to trim less and need to take more off later to ensure you do not make the insole too short.
Step 4: Place the trimmed insole in your shoe
Place the insole in your shoe and make sure it fits flat into the shoe with no buckling or bubbling. If it is still too long, then take the insole out and trim just a little more off the end. Repeat this process until it is a perfect fit.
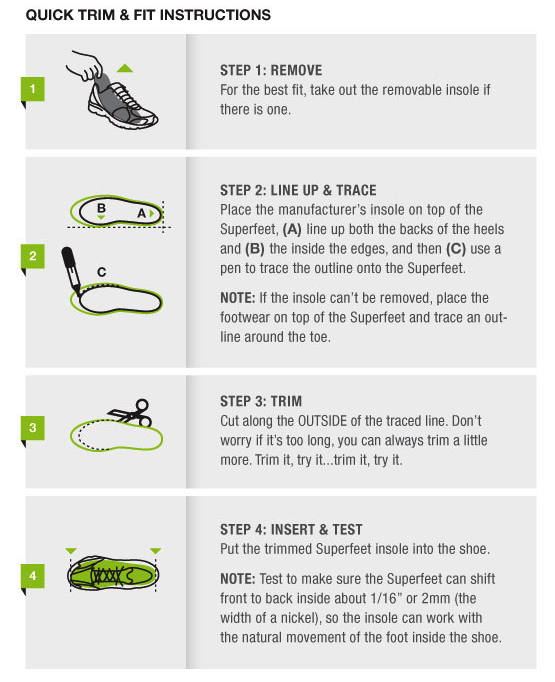
There you have it! Trimming your insoles is as easy as 1,2, 3, 4. The Superfeet insole company has a great diagram to show how simple trimming the end of your insole is with these 4 simple steps. The Superfeet Quick Trim & Fit Instructions are posted below.
How to Trim Your Insoles in 4 Simple Steps Diagram
Additional insole-trimming tips
Here are a few other tips to set you up for success.
Make Sure to Get the Correct Insole Size
Even though you can trim just about any size insole to make them fit inside your shoe, it is still important that you get the proper size for your foot. Sizing on insoles corresponds with your foot and shoe size, but it also corresponds with your arch length. The insole will be the most effective if you have the right insert for your arch length. Since you are paying the extra bucks to add the support to your shoe, you want to make sure that the support is in the right place to be most effective for you.
Don’t Trim too Much Off
Remember, measure twice and cut once!
Making the insole too short will leave a gap at the end of the insole. You want to avoid this because it can cause your toes to grip in the shoe in an unnatural way. Trim less rather than more. You can always trim a little more off the end if it is still too long for the sho
Purchase Insoles for Each Pair of Shoes
Although you can move your insoles from shoe to shoe, it really is best to have a pair of insoles for each pair of your shoes. This allows you to make sure the fit for each shoe is perfect. You can trim each insole so that it fits exactly in your shoe. It also helps you keep track of when your insoles should be replaced because the general recommendation is to replace your insoles when you replace your shoes. So when the budget allows, it’s good to go ahead and get a set of insoles for each pair of shoes that you will wear your insoles in.
Get free shipping on your next pair of insoles with insoles.com!
We’ve curated dozens of insoles across brands to bring you the best selection of insoles for every shoe type, activity, or brand.